generator-aspnet – yo generator for ASP.NET 5
情報源: OmniSharp/generator-aspnet · GitHub
kがdnxに変わり、それによも無いYeomanのgenerator-aspnetも多少変わりましたのでアップデートします。
インストール手順
node.jsをインストールします。
dnxを使用できるようにしておきます。
次でYeomanをインストールします。
npm install -g yo次でgenerator-aspnetをインストールします。
npm install -g generator-aspnetgruntとbowerも必要なのでインストールします。
npm install -g grunt-cli
npm install -g bower
インストールとしては以上なのですが、時々npmのパッケージのフォルダにパスが通っていない場合があるので、その場合には以下のディレクトリをpathに追加します。
%USERPROFILE%\AppData\Roaming\npm使用方法
ASP.NETのプロジェクトを作成したいディレクトリの親ディレクトリで以下のようにコマンドします。
>yo aspnet

     _-----_
    |       |    .--------------------------.
    |--(o)--|    |      Welcome to the      |
   `---------´   |   marvellous ASP.NET 5   |
    ( _´U`_ )    |        generator!        |
    /___A___\    '--------------------------'
     |  ~  |
   __'.___.'__
 ´   `  |° ´ Y `

? What type of application do you want to create? (Use arrow keys)
> Empty Application
  Console Application
  Web Application
  Web API Application
  Nancy ASP.NET Application
  Class Library
このような表示になるので、プロンプト「>」をカーソルキーで上下に動かし、目的のプロジェクトのタイプでEnterキーを押します。
Web Applicationで説明を進めます。
選択すると? What's the name of your ASP.NET application? (WebApplication)と聞いてきますので、プロジェクト名を入力します。また、これがディレクトリの名前にもなります。
名前を入力すると、yeomanがディレクトリを作成し、必要なファイルをコピーします。
? What's the name of your ASP.NET application? BlogTest
   create BlogTest\.gitgnore
   create BlogTest\Startup.cs
   create BlogTest\bower.json
   create BlogTest\config.json
   create BlogTest\MessageService.cs
   create BlogTest\project.json
   create BlogTest\package.json
   create BlogTest\gruntfile.js
   create BlogTest\Models\AccountViewModels.cs
   create BlogTest\Models\IdentityModels.cs
   create BlogTest\Models\ManageViewModels.cs
   create BlogTest\Controllers\AccountController.cs
   create BlogTest\Controllers\HomeController.cs
   create BlogTest\Controllers\ManageController.cs
   create BlogTest\Compiler\Preprocess\RazorPreCompilation.cs
   create BlogTest\Migrations\000000000000000_CreateIdentitySchema.cs
   create BlogTest\Migrations\ApplicationDbContextModelSnapshot.cs
   create BlogTest\Properties\AppSettings.cs
   create BlogTest\Views\Account\ConfirmEmail.cshtml
   create BlogTest\Views\Account\ExternalLoginConfirmation.cshtml
   create BlogTest\Views\Account\ExternalLoginFailure.cshtml
   create BlogTest\Views\Account\ForgotPassword.cshtml
   create BlogTest\Views\Account\ForgotPasswordConfirmation.cshtml
   create BlogTest\Views\Account\Login.cshtml
   create BlogTest\Views\Account\Register.cshtml
   create BlogTest\Views\Account\ResetPassword.cshtml
   create BlogTest\Views\Account\ResetPasswordConfirmation.cshtml
   create BlogTest\Views\Account\SendCode.cshtml
   create BlogTest\Views\Account\VerifyCode.cshtml
   create BlogTest\Views\Home\Contact.cshtml
   create BlogTest\Views\Home\About.cshtml
   create BlogTest\Views\Home\Index.cshtml
   create BlogTest\Views\Manage\AddPhoneNumber.cshtml
   create BlogTest\Views\Manage\ChangePassword.cshtml
   create BlogTest\Views\Manage\Index.cshtml
   create BlogTest\Views\Manage\ManageLogins.cshtml
   create BlogTest\Views\Manage\RemoveLogin.cshtml
   create BlogTest\Views\Manage\SetPassword.cshtml
   create BlogTest\Views\Manage\VerifyPhoneNumber.cshtml
   create BlogTest\Views\Shared\Error.cshtml
   create BlogTest\Views\Shared\_Layout.cshtml
   create BlogTest\Views\Shared\_LoginPartial.cshtml
   create BlogTest\Views\Shared\_ValidationScriptsPartial.cshtml
   create BlogTest\Views\_GlobalImport.cshtml
   create BlogTest\Views\_ViewStart.cshtml
   create BlogTest\wwwroot\_references.js
   create BlogTest\wwwroot\css\site.css
   create BlogTest\wwwroot\favicon.ico
   create BlogTest\wwwroot\images\ASP-NET-Banners-01.png
   create BlogTest\wwwroot\images\ASP-NET-Banners-02.png
   create BlogTest\wwwroot\images\Banner-01-Azure.png
   create BlogTest\wwwroot\images\Banner-02-VS.png
   create BlogTest\wwwroot\lib\bootstrap-touch-carousel\css\bootstrap-touch-carousel.css
   create BlogTest\wwwroot\lib\bootstrap-touch-carousel\js\bootstrap-touch-carousel.js
   create BlogTest\wwwroot\lib\bootstrap\css\bootstrap-theme.css
   create BlogTest\wwwroot\lib\bootstrap\css\bootstrap-theme.min.css
   create BlogTest\wwwroot\lib\bootstrap\css\bootstrap.css
   create BlogTest\wwwroot\lib\bootstrap\css\bootstrap.min.css
   create BlogTest\wwwroot\lib\bootstrap\fonts\glyphicons-halflings-regular.eot
   create BlogTest\wwwroot\lib\bootstrap\fonts\glyphicons-halflings-regular.svg
   create BlogTest\wwwroot\lib\bootstrap\fonts\glyphicons-halflings-regular.ttf
   create BlogTest\wwwroot\lib\bootstrap\fonts\glyphicons-halflings-regular.woff
   create BlogTest\wwwroot\lib\bootstrap\js\bootstrap.js
   create BlogTest\wwwroot\lib\bootstrap\js\bootstrap.min.js
   create BlogTest\wwwroot\lib\hammer.js\hammer.js
   create BlogTest\wwwroot\lib\hammer.js\hammer.min.js
   create BlogTest\wwwroot\lib\hammer.js\hammer.min.map
   create BlogTest\wwwroot\lib\jquery-validation-unobtrusive\jquery.validate.unobtrusive.js
   create BlogTest\wwwroot\lib\jquery-validation\jquery.validate.js
   create BlogTest\wwwroot\lib\jquery\jquery-migrate.js
   create BlogTest\wwwroot\lib\jquery\jquery-migrate.min.js
   create BlogTest\wwwroot\lib\jquery\jquery.js
   create BlogTest\wwwroot\lib\jquery\jquery.min.js
   create BlogTest\wwwroot\lib\jquery\jquery.min.map


Your project is now created, you can use the following commands to get going
    dnu restore
    dnu build
    dnx . run for console projects
    dnx . kestrel or dnx . web for web projects
あとは作成されたディレクトリに移動後、最後書かれている手順通りに実行すれば問題ありません。
また、レストア時にgrunt, bowerが呼び出されるので、インストール手順にも書きましたが忘れずにインストールしましょう。
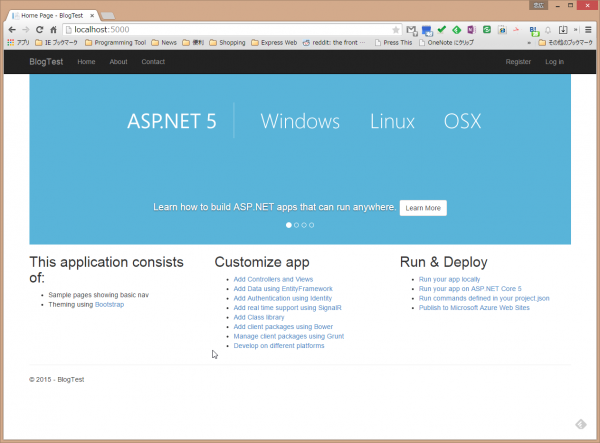
最終的に、dnx . webでアプリケーションを起動すれば、次のように作成されたWEBサイトが表示されます。


コメント
[…] 新規にインストールする場合は過去記事を参照。 […]