
Red Hat Enterprise Linux 7へ.NET Core 1.0をインストールし、開発環境を整えるまでを説明します。
ゴールは以下となります。
- .NET Core 1.0のインストール。
- node.js, yeomanのインストールし、generator-aspnetでプロジェクトを作成できるようにする。
- Visuaul Studio Codeのインストール し、C#のコードを編集できるようにする。
.NET Core 1.0のインストール
資料: Chapter 1. Install .NET Core 1.0.0 on Red Hat Enterprise Linux – Red Hat Customer Portal
基本的に上資料の方法で進めていけば問題ありません。
RHELのサブスクリプションが登録されている前提で、まずsuで、rootに入って、使用中のシステムで使用可能なすべてのサブスクリプションのリストを表示し、.NET Coreのリポジトリへのアクセスを提供するサブスクリプションのプールIDを表示させます。
$ su -
# subscription-manager list --available
ここでUUID(GUID)のpool IDが表示されるので、それを登録します。
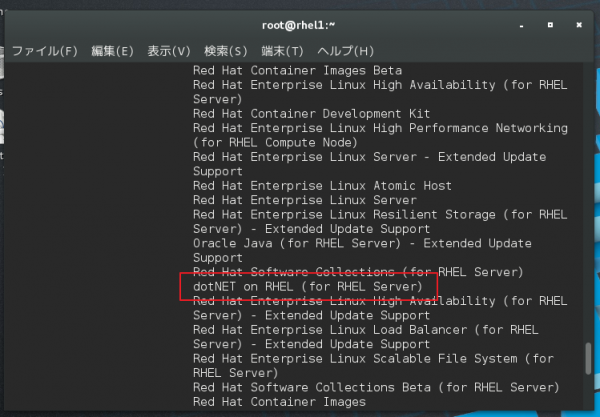
# subscription-manager attach --pool=つづいて、.NET Coreのリポジトリが登録されているか、次のコマンドで確認します。
# subscription-manager list --consumed下図の様に.NET Coreのリポジトリが登録されていれば問題ありません。

RHEL 7向けの.NET Core channelを有効にします。
# subscription-manager repos --enable=rhel-7-server-dotnet-rpmssclツールをインストールします。
# yum install scl-utils一度yum upgradeで全体的にアップグレードします。
# yum clean all
# yum upgrade -y
# yum clean all
.NET Core 1.0とその関連コンポーネントをインストールします。
# yum install rh-dotnetcore10

Loaded plugins: langpacks, product-id, search-disabled-repos, subscription-manager
Resolving Dependencies
--> Running transaction check
---> Package rh-dotnetcore10.x86_64 0:1.0-4.el7 will be installed
--> Processing Dependency: rh-dotnetcore10-dotnetcore for package: rh-dotnetcore10-1.0-4.el7.x86_64

<途中略>

Installing:
 rh-dotnetcore10                      x86_64           1.0-4.el7                rh-dotnetcore10           2.1 k
Installing for dependencies:
 rh-dotnetcore10-dotnetcore           x86_64           1.0.0-5.el7              rh-dotnetcore10            38 M
 rh-dotnetcore10-libcurl              x86_64           7.47.1-3.el7             rh-dotnetcore10           23
Installed:
  rh-dotnetcore10.x86_64 0:1.0-4.el7
Dependency Installed:
  rh-dotnetcore10-dotnetcore.x86_64 0:1.0.0-5.el7         rh-dotnetcore10-libcurl.x86_64 0:7.47.1-3.el7
Complete!
以上でインストール完了。suから抜けます。
.NET Core 1.0環境を有効にするためには以下のようにsclコマンドで有効にします。
$ scl enable rh-dotnetcore10 bash毎回これを入力するのは面倒なので.bashrcにaliasを登録しておくのが良いと思います。
例:
alias dotnet1='scl enable rh-dotnetcore10 bash'以下のようにして、.NET Core 1.0がインストール出来ているか確認しましょう。
$ dotnet --help
.NET Command Line Tools (1.0.0-preview1-002702)
Usage: dotnet [common-options] [command] [arguments]

Arguments:
  [command]     The command to execute
  [arguments]   Arguments to pass to the command

Common Options (passed before the command):
  -v|--verbose  Enable verbose output
  --version     Display .NET CLI Version Number
  --info        Display .NET CLI Info

Common Commands:
  new         Initialize a basic .NET project
  restore     Restore dependencies specified in the .NET project
  build       Builds a .NET project
  publish     Publishes a .NET project for deployment (including the runtime)
  run         Compiles and immediately executes a .NET project
  test        Runs unit tests using the test runner specified in the project
  pack        Creates a NuGet package
では、動作検証を含めて、Hello Worldアプリを作ります。
$ mkdir hello-world
$ cd hello-world
$ dotnet new

Welcome to .NET Core!

Learn more about .NET Core @ https://aka.ms/dotnet-docs. Use dotnet --help to see available commands or go to https://aka.ms/dotnet-cli-docs.

Telemetry
The .NET Core tools collect usage data in order to improve your experience. The data is anonymous and does not include commandline arguments. The data is collected by Microsoft and shared with the community. You can opt out of telemetry by setting a DOTNET_CLI_TELEMETRY_OPTOUT environment variable to 1 using your favorite shell. Read more about .NET Core tools telemetry @ https://aka.ms/dotnet-cli-telemetry.

Configuring...

A command is running to initially populate your local package cache, to improve restore speed and enable offline access. This command will take up to a minute to complete and will only happen once.

Decompressing 100% 1781 ms
Expanding 100% 5167 ms
Created new C# project in /home/lesw/hello-world.
$ dotnet restore
log  : Restoring packages for /home/lesw/hello-world/project.json...
log  : Writing lock file to disk. Path: /home/lesw/hello-world/project.lock.json
log  : /home/lesw/hello-world/project.json
log  : Restore completed in 638ms.
$ dotnet run
Project hello-world (.NETCoreApp,Version=v1.0) will be compiled because expected outputs are missing
Compiling hello-world for .NETCoreApp,Version=v1.0

Compilation succeeded.
    0 Warning(s)
    0 Error(s)

Time elapsed 00:00:00.9286845

Hello World!
ここまで来れば、.NET Core 1.0のインストールは完了です。
node.js, yeomanのインストール
node.js 4のインストール
Visual Studioがあれば、簡単にプロジェクトテンプレートを作ることができますが、RHELでは残念ながら動作しないので、node.jsで動作するスキャフォールディングツールであるyeomanのgenerator-aspnetを使って.NET Coreアプリケーションのプロジェクトテンプレート作成等を出来るようにしたいと思います。
まずは、yeomanをインストールし、動作させるためにnode.jsのインストールが必要なのですが、以下手順にてnode.js 4.4のインストールを行ってください。
Software Collections - Get started developing with Node.js v4 on RHEL 7
手順の日本語簡約は省きますが、.NET Coreでの手順と大体一緒なので見ていただければ判ると思います。
nodejsも毎回sclコマンドを入力するのは面倒なので、aliasを.bashrcに加えておきましょう。
例:
alias node4='scl enable rh-nodejs4 bash'yeoman, generator-aspnetのインストール
npmコマンドで必要なものをグローバルにインストールします。suで作業します。
$ su -
# scl enable rh-nodejs4 bash
# npm update -g
# npm install -g yo bower grunt-cli generator-aspnet
<出力結果省略>
ここでもsclコマンドでの環境設定が必要なので、面倒なのでrootの.bashrcでもaliasを加えておくのが良いでしょう。
suは抜けます。
では、yeomanとgenetor-aspnetを使って、ASP.NET coreのアプリケーションを作成します。
sclコマンドでnode.jsと.NET Coreを有効にし、yo aspnetで、アプリケーションの雛形を作成します。
$ scl enable rh-nodejs4 bash
$ scl  enable rh-dotnetcore10 bash
$ yo aspnet

     _-----_     ╭──────────────────────────╮
    |       |    │      Welcome to the      │
    |--(o)--|    │  marvellous ASP.NET Core │
   `---------´   │        generator!        │
    ( _´U`_ )    ╰──────────────────────────╯
    /___A___\   /
     |  ~  |
   __'.___.'__
 ´   `  |° ´ Y `

? What type of application do you want to create?
  Empty Web Application
  Console Application
❯ Web Application
  Web Application Basic [without Membership and Authorization]
  Web API Application
  Class Library
  Unit test project (xUnit.net)
Web Applicationを選択します。
     _-----_     ╭──────────────────────────╮
    |       |    │      Welcome to the      │
    |--(o)--|    │  marvellous ASP.NET Core │
   `---------´   │        generator!        │
    ( _´U`_ )    ╰──────────────────────────╯
    /___A___\   /
     |  ~  |
   __'.___.'__
 ´   `  |° ´ Y `

? What type of application do you want to create? Web Application
? Which UI framework would you like to use? (Use arrow keys)
❯ Bootstrap (3.3.6)
  Semantic UI (2.1.8)
Bootstrapを選択する。
     _-----_     ╭──────────────────────────╮
    |       |    │      Welcome to the      │
    |--(o)--|    │  marvellous ASP.NET Core │
   `---------´   │        generator!        │
    ( _´U`_ )    ╰──────────────────────────╯
    /___A___\   /
     |  ~  |
   __'.___.'__
 ´   `  |° ´ Y `

? What type of application do you want to create? Web Application
? Which UI framework would you like to use? Bootstrap (3.3.6)
? What's the name of your ASP.NET application? (WebApplication) hwweb
アプリケーション名を確認されるので、ここではhwwebとします。
? What's the name of your ASP.NET application? hwweb
   create hwweb/Dockerfile
   create hwweb/.bowerrc
   create hwweb/.gitignore
   create hwweb/appsettings.json
   create hwweb/bower.json
   create hwweb/bundleconfig.json
   create hwweb/Program.cs
   create hwweb/project.json
   create hwweb/README.md
   create hwweb/Startup.cs
   create hwweb/Controllers/AccountController.cs
   create hwweb/Controllers/HomeController.cs
   create hwweb/Controllers/ManageController.cs
   create hwweb/Data/Migrations/00000000000000_CreateIdentitySchema.Designer.cs
   create hwweb/Data/Migrations/00000000000000_CreateIdentitySchema.cs
   create hwweb/Data/Migrations/ApplicationDbContextModelSnapshot.cs
   create hwweb/Data/ApplicationDbContext.cs
   create hwweb/Models/ApplicationUser.cs
   create hwweb/Models/AccountViewModels/ExternalLoginConfirmationViewModel.cs
   create hwweb/Models/AccountViewModels/ForgotPasswordViewModel.cs
   create hwweb/Models/AccountViewModels/LoginViewModel.cs
   create hwweb/Models/AccountViewModels/RegisterViewModel.cs
   create hwweb/Models/AccountViewModels/ResetPasswordViewModel.cs
   create hwweb/Models/AccountViewModels/SendCodeViewModel.cs
   create hwweb/Models/AccountViewModels/VerifyCodeViewModel.cs
   create hwweb/Models/ManageViewModels/AddPhoneNumberViewModel.cs
   create hwweb/Models/ManageViewModels/ChangePasswordViewModel.cs
   create hwweb/Models/ManageViewModels/ConfigureTwoFactorViewModel.cs
   create hwweb/Models/ManageViewModels/FactorViewModel.cs
   create hwweb/Models/ManageViewModels/IndexViewModel.cs
   create hwweb/Models/ManageViewModels/ManageLoginsViewModel.cs
   create hwweb/Models/ManageViewModels/RemoveLoginViewModel.cs
   create hwweb/Models/ManageViewModels/SetPasswordViewModel.cs
   create hwweb/Models/ManageViewModels/VerifyPhoneNumberViewModel.cs
   create hwweb/Properties/launchSettings.json
   create hwweb/Services/IEmailSender.cs
   create hwweb/Services/ISmsSender.cs
   create hwweb/Services/MessageServices.cs
   create hwweb/Views/Account/ConfirmEmail.cshtml
   create hwweb/Views/Account/ExternalLoginConfirmation.cshtml
   create hwweb/Views/Account/ExternalLoginFailure.cshtml
   create hwweb/Views/Account/ForgotPassword.cshtml
   create hwweb/Views/Account/ForgotPasswordConfirmation.cshtml
   create hwweb/Views/Account/Lockout.cshtml
   create hwweb/Views/Account/Login.cshtml
   create hwweb/Views/Account/Register.cshtml
   create hwweb/Views/Account/ResetPassword.cshtml
   create hwweb/Views/Account/ResetPasswordConfirmation.cshtml
   create hwweb/Views/Account/SendCode.cshtml
   create hwweb/Views/Account/VerifyCode.cshtml
   create hwweb/Views/Home/About.cshtml
   create hwweb/Views/Home/Contact.cshtml
   create hwweb/Views/Home/Index.cshtml
   create hwweb/Views/Manage/AddPhoneNumber.cshtml
   create hwweb/Views/Manage/ChangePassword.cshtml
   create hwweb/Views/Manage/Index.cshtml
   create hwweb/Views/Manage/ManageLogins.cshtml
   create hwweb/Views/Manage/SetPassword.cshtml
   create hwweb/Views/Manage/VerifyPhoneNumber.cshtml
   create hwweb/Views/Shared/Error.cshtml
   create hwweb/Views/Shared/_Layout.cshtml
   create hwweb/Views/Shared/_LoginPartial.cshtml
   create hwweb/Views/Shared/_ValidationScriptsPartial.cshtml
   create hwweb/Views/_ViewImports.cshtml
   create hwweb/Views/_ViewStart.cshtml
   create hwweb/wwwroot/css/site.css
   create hwweb/wwwroot/css/site.min.css
   create hwweb/wwwroot/favicon.ico
   create hwweb/wwwroot/images/banner1.svg
   create hwweb/wwwroot/images/banner2.svg
   create hwweb/wwwroot/images/banner3.svg
   create hwweb/wwwroot/images/banner4.svg
   create hwweb/wwwroot/js/site.js
   create hwweb/wwwroot/js/site.min.js
   create hwweb/web.config


I'm all done. Running bower install for you to install the required dependencies. If this fails, try running the command yourself.


bower cached        https://github.com/twbs/bootstrap.git#3.3.6
bower validate      3.3.6 against https://github.com/twbs/bootstrap.git#3.3.6
bower cached        https://github.com/jquery/jquery-dist.git#2.2.3
bower validate      2.2.3 against https://github.com/jquery/jquery-dist.git#2.2.3
bower cached        https://github.com/jzaefferer/jquery-validation.git#1.15.0
bower validate      1.15.0 against https://github.com/jzaefferer/jquery-validation.git#1.15.0
bower cached        https://github.com/aspnet/jquery-validation-unobtrusive.git#3.2.6
bower validate      3.2.6 against https://github.com/aspnet/jquery-validation-unobtrusive.git#3.2.6
bower install       jquery-validation-unobtrusive#3.2.6
bower install       jquery#2.2.3
bower install       jquery-validation#1.15.0
bower install       bootstrap#3.3.6

jquery-validation-unobtrusive#3.2.6 wwwroot/lib/jquery-validation-unobtrusive
├── jquery#2.2.3
└── jquery-validation#1.15.0

jquery#2.2.3 wwwroot/lib/jquery

jquery-validation#1.15.0 wwwroot/lib/jquery-validation
└── jquery#2.2.3


Your project is now created, you can use the following commands to get going
    cd "hwweb"
    dotnet restore
    dotnet build (optional, build will also happen when it's run)
    dotnet ef database update (to create the SQLite database for the project)
    dotnet run
あとは書いてある手順どおりです。
$ cd hwweb
$ dotnet restore
log : Restoring packages for /home/ishisaka/src/hwweb/project.json...
log : Installing Microsoft.EntityFrameworkCore.Sqlite.Design 1.0.0.
log : Restoring packages for tool 'BundlerMinifier.Core' in /home/ishisaka/src/hwweb/project.json...
log : Restoring packages for tool 'Microsoft.AspNetCore.Razor.Tools' in /home/ishisaka/src/hwweb/project.json...
log : Restoring packages for tool 'Microsoft.AspNetCore.Server.IISIntegration.Tools' in /home/ishisaka/src/hwweb/project.json...
log : Restoring packages for tool 'Microsoft.EntityFrameworkCore.Tools' in /home/ishisaka/src/hwweb/project.json...
log : Restoring packages for tool 'Microsoft.Extensions.SecretManager.Tools' in /home/ishisaka/src/hwweb/project.json...
log : Restoring packages for tool 'Microsoft.VisualStudio.Web.CodeGeneration.Tools' in /home/ishisaka/src/hwweb/project.json...
log : Writing lock file to disk. Path: /home/ishisaka/src/hwweb/project.lock.json
log : /home/ishisaka/src/hwweb/project.json
log : Restore completed in 19044ms.
$ dotnet build
Project hwweb (.NETCoreApp,Version=v1.0) will be compiled because project is not safe for incremental compilation. Use --build-profile flag for more information.
Compiling hwweb for .NETCoreApp,Version=v1.0
Bundling with configuration from /home/ishisaka/src/hwweb/bundleconfig.json
Processing wwwroot/css/site.min.css
Bundled
Minified
Processing wwwroot/js/site.min.js
Bundled
Compilation succeeded.
0 Warning(s)
0 Error(s)
Time elapsed 00:00:06.2161396
(The compilation time can be improved. Run "dotnet build --build-profile" for more information)
$ dotnet ef database update
Project hwweb (.NETCoreApp,Version=v1.0) will be compiled because project is not safe for incremental compilation. Use --build-profile flag for more information.
Compiling hwweb for .NETCoreApp,Version=v1.0
Bundling with configuration from /home/ishisaka/src/hwweb/bundleconfig.json
Processing wwwroot/css/site.min.css
Bundled
Minified
Processing wwwroot/js/site.min.js
Compilation succeeded.
0 Warning(s)
0 Error(s)
Time elapsed 00:00:03.5448853
(The compilation time can be improved. Run "dotnet build --build-profile" for more information)
Done.
$ dotnet run
Project hwweb (.NETCoreApp,Version=v1.0) will be compiled because project is not safe for incremental compilation. Use --build-profile flag for more information.
Compiling hwweb for .NETCoreApp,Version=v1.0
Bundling with configuration from /home/ishisaka/src/hwweb/bundleconfig.json
Processing wwwroot/css/site.min.css
Bundled
Minified
Processing wwwroot/js/site.min.js
Compilation succeeded.
0 Warning(s)
0 Error(s)
Time elapsed 00:00:03.5691780
(The compilation time can be improved. Run "dotnet build --build-profile" for more information)
info: Microsoft.Extensions.DependencyInjection.DataProtectionServices[0]
User profile is available. Using '/home/ishisaka/.aspnet/DataProtection-Keys' as key repository; keys will not be encrypted at rest.
Hosting environment: Production
Content root path: /home/ishisaka/src/hwweb
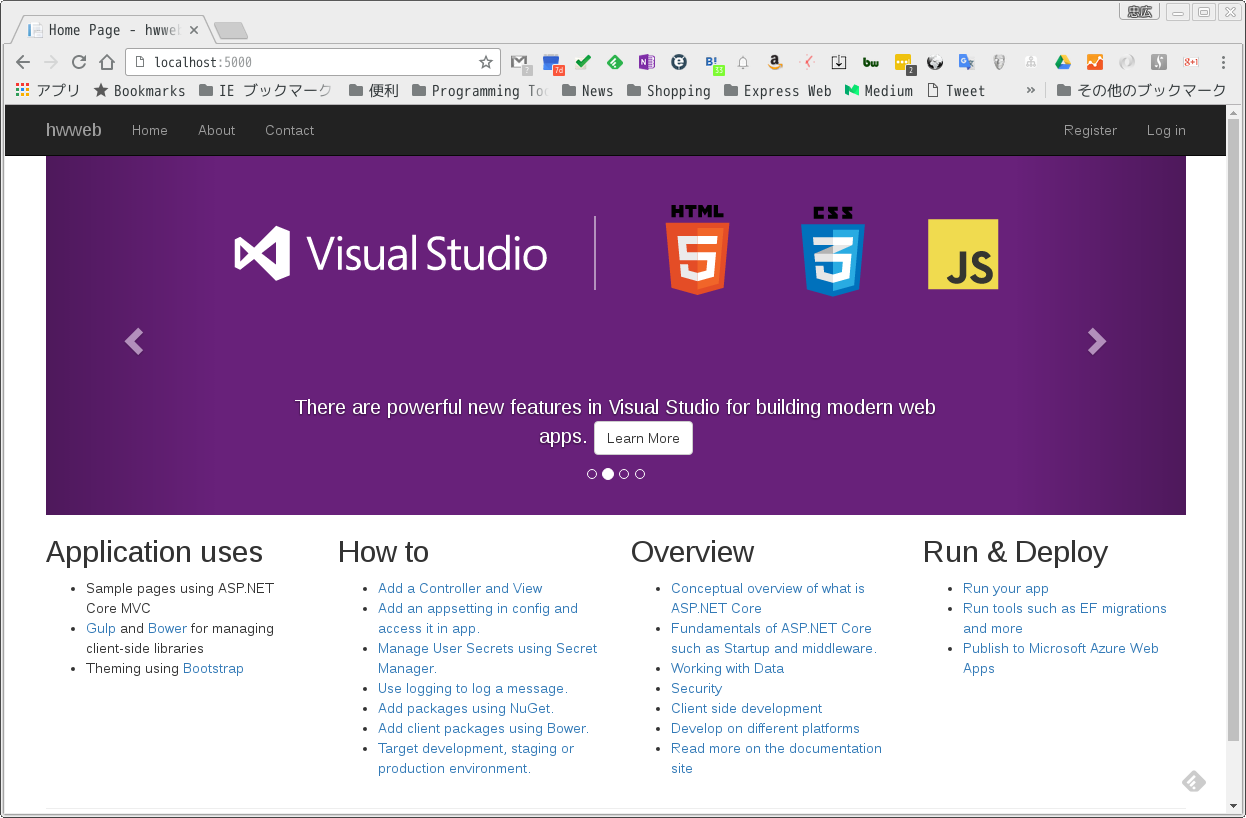
Now listening on: http://localhost:5000
Application started. Press Ctrl+C to shut down.
これで実行ファイルのセルフホストでWEBアプリケーションが起動しました。
yeoman, generator-aspnetのインストールは以上です。
Visuaul Studio Codeのインストール
これでプロジェクトテンプレートからプロジェクトを作成し、アプリケーションを実行する環境を構築することができたので、あと必要なのはコードを編集し、デバッグする環境です。
もちろん、vim, emacsでの開発も行えますが、ここではVisual Studio Codeを使っていきたいと思います。
残念ながらyum install一発でインストールはできないので、以下からrpmをダウンロードします。
ダウンロードしたら、ターミナルでダウンロードしたディレクトリに移動し、以下の要領でインストールします。
$ sudo yum install .rpm インストールが終われば、ターミナルでcodeとタイプすれば、Visual Studio Code(VS Code)が起動します。
次に起動したVS Code状でF1キーを押し、コマンドパレットが起動したら、下図のように拡張機能のインストールを選択してC#拡張を選択してインストールします。

インストール後再起動が促されるので、再起動し、VS Codeは一旦終了します。
先程作成したWEBアプリケーションのディレクトリに移動し、今度は'code .'と.をつけてVS Codeを起動します。

今度は左側にディレクトリのファイルやサブディレクトリが表示されています。その中からProgram.csを選択し、う絵図にあるように、28行目にブレークポイントを設定します。ブレークポイントの設定は行番号の左側をクリックします。
この状態でF5キーを押してデバッグ実行します。プルダウンが出てくるので、.NET Coreを選択します。
すると、設定ファイルを編集しろと言う内容のメッセージが表示されて、launch.jsonファイルが表示されるので、必要な箇所を編集します。編集が必要なのは9行目と20行目で、デバッグ対象となるエントリーポイントのあるdllファイルを指定する必要があります。
私の例では以下のようになります。
{
    "version": "0.2.0",
    "configurations": [
        {
            "name": ".NET Core Launch (console)",
            "type": "coreclr",
            "request": "launch",
            "preLaunchTask": "build",
            "program": "${workspaceRoot}/bin/Debug/netcoreapp1.0/hwweb.dll",
            "args": [],
            "cwd": "${workspaceRoot}",
            "stopAtEntry": false,
            "externalConsole": false
        },
        {
            "name": ".NET Core Launch (web)",
            "type": "coreclr",
            "request": "launch",
            "preLaunchTask": "build",
            "program": "${workspaceRoot}/bin/Debug/netcoreapp1.0/hwweb.dll",
            "args": [],
            "cwd": "${workspaceRoot}",
            "stopAtEntry": false,
            "launchBrowser": {
                "enabled": true,
                "args": "${auto-detect-url}",
                "windows": {
                    "command": "cmd.exe",
                    "args": "/C start ${auto-detect-url}"
                },
                "osx": {
                    "command": "open"
                },
                "linux": {
                    "command": "xdg-open"
                }
            },
            "env": {
                "ASPNETCORE_ENVIRONMENT": "Development"
            }
        },
        {
            "name": ".NET Core Attach",
            "type": "coreclr",
            "request": "attach",
            "processId": 0
        }
    ]
}
以上編集し、保存した後、再度F5キーでデバッグ実行しようとすると、今度はタクランナーがないとメッセージが出てきて、作成を選ぶと対象環境がプルダウンで出てくるので、ここでも.NET Coreを選択します。すると以下のtask.jsonが表示されますが、特に編集は必要ないのでそのまま保存します。
{
    // See https://go.microsoft.com/fwlink/?LinkId=733558
    // for the documentation about the tasks.json format
    "version": "0.1.0",
    "command": "dotnet",
    "isShellCommand": true,
    "args": [],
    "tasks": [
        {
            "taskName": "build",
            "args": [ ],
            "isBuildCommand": true,
            "showOutput": "silent",
            "problemMatcher": "$msCompile"
        }
    ]
}
再度F5実行すると今度こそデバッグ実行が走り、下図の様に設定したブレークポイントで止まります。

変数の確認や、スタックトレースの確認も出来ます。
VS Codeでの編集機能についてはここでは書きませんが、インテリセンスやコードレンズ機能も使用でき非常に多機能です。詳細はVS Codeのサイトで確認してください。
VS Code以外
vimやemacs、ATOM等でC#/.NET Coreの編集環境を構築するためのomnisharpと言うプロジェクトがあります。これらのエディタを使用されている方は、以下のomnisharpのページを確認してみてください。

まとめ
RHELでもWindows & Visual Studio並みとは行かないまでも、それなりに開発環境を整えることがおわかり頂けたかと思います。導入の煩雑さも他の言語と大きく変わることは基本的にありません。Red Hatのサポートもありますし、Red Hatでのアプリケーション開発時の選択肢として.NET/C#も十分考慮の対象になるのでは無いかと思います。

コメント